For the Ad-Free Knitting pattern of the flower puff cardigan head HERE.
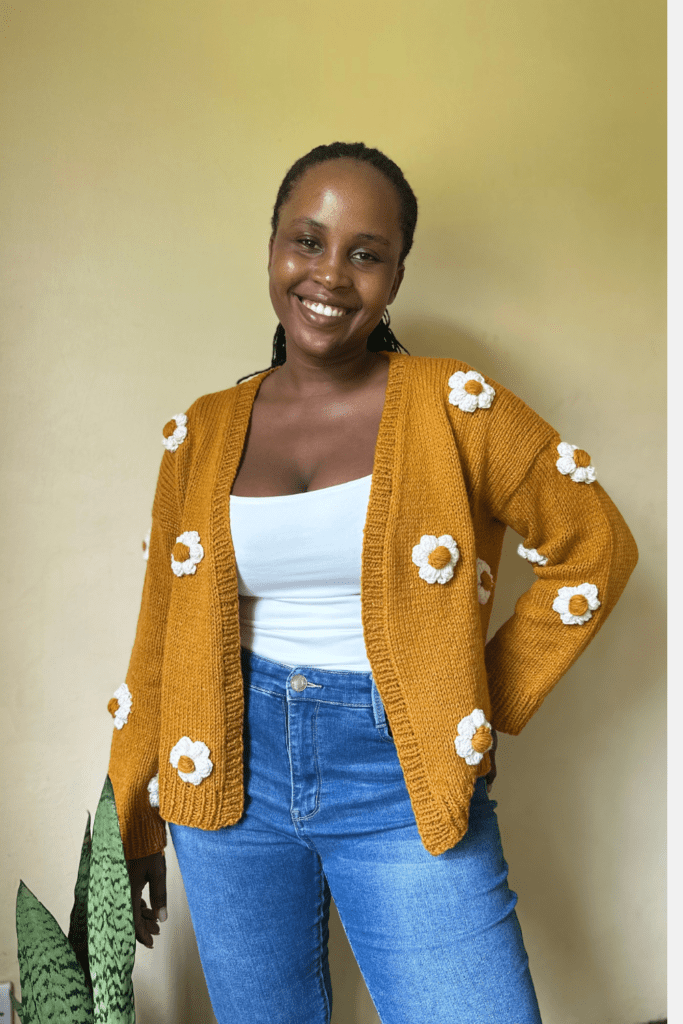
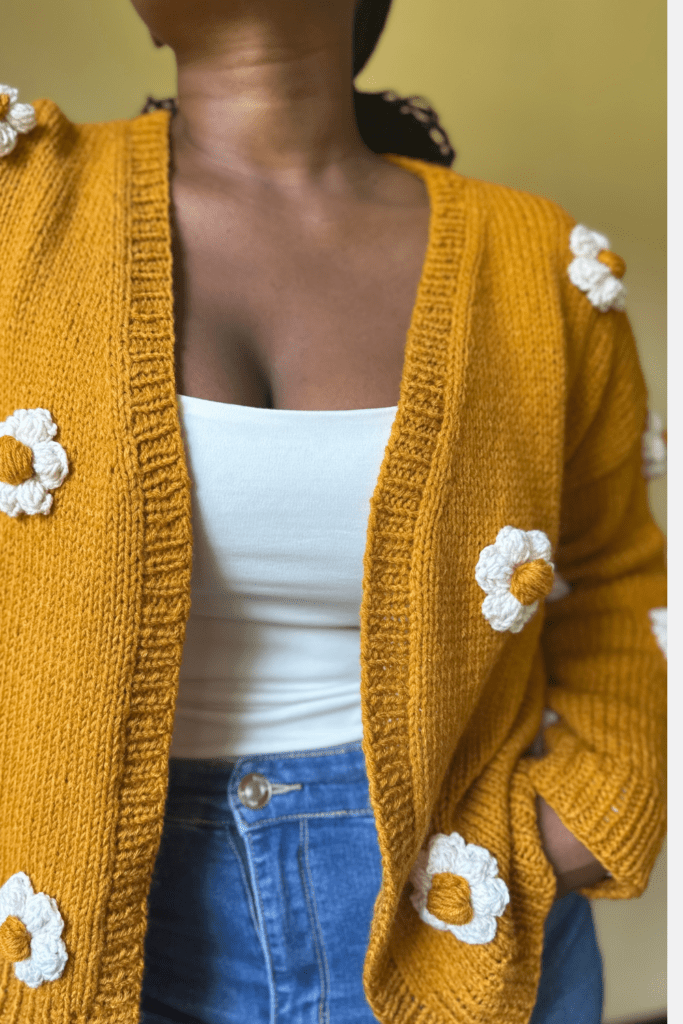
I have had this knit cardigan on my Wishlist for the longest time. I have been wanting to knit something with more color and attitude, I am tired of knitting in stockinette and so i thought why not a bright knit flower puff cardigan?
This is made from my original Knit Drop Shoulder Cardigan pattern, i just added more rows so as to make it longer and sized down a bit on the yarn. It did not make much of a difference for me, as the yarn was not much different.
Before we go any further, consider these cute crochet merch t-shirt that make great gifts for crocheters and knitters too or just buy yourself one because they are so so cute! Shop HERE!
Materials
3(or more) 0.8″ buttons (optional)
5.5mm & 4.5mm knitting needles
Knitting Cables
You will need 2 knitting cables for this. Or just one if you know how to work the magic knitting loop.
I suggest you learn the magic loop technique if you do not already know how.
Recommended Yarn

I did not use this exact yarn, I used my local 4 ply acrylic yarn and achieved gauge by holding two strands together, I would not recommend that for you so consider buying THIS yarn unless you have similar yarn laying around
Amount Of Yarn Needed
| SIZE | XS | S | M | L | XL | 2XL | 3XL |
| YARDAGE | 750 | 825 | 900 | 975 | 1050 | 1125 | 1200 |
Knitted Cardigan Measurements
SIZES:XS(S,M,L,XL,2XL,3XL)
GAUGE: 23 sts, 15 rows= 10cm (4″X4″)
CHEST MEASUREMENTS: 30 (34, 38, 42, 46, 50, 54) inches or 76(86,96,106,116,127,137)
cm
LEVEL: Advanced beginner
Finished Measurements For the one i made (Size small)
Chest circumference: 38″ or 98 cm
Body Length: 20.47″ or 52 cm
Sleeve length: 18.8″ or 48.5cm
Upper arm circumference: 14.57″ or 37cm
Shoulder width: 20.5″ or 53.5cm
Neckline Opening (from the collar): 5″ or 13cm
Finished Measurements for all sizes
(All measurements are for the finished garment, not body measurements.)
- Chest Circumference: XS (S, M, L, XL, 2XL, 3XL) = 34 (38, 42, 46, 50, 54, 58) inches / 86 (98, 106, 116, 126, 136, 146) cm
- Body Length: XS (S, M, L, XL, 2XL, 3XL) = 16.5 (17.5, 18.5, 19.5, 20.5, 21.5, 22.5) inches / 42 (45, 47, 50, 52, 55, 57) cm
- Sleeve Length: XS (S, M, L, XL, 2XL, 3XL) = 18 (18.8, 19.5, 20, 20.5, 21, 21.5) inches / 46 (48.5, 50, 51, 52, 53, 54.5) cm
- Upper Arm Circumference: XS (S, M, L, XL, 2XL, 3XL) = 12.5 (14, 15.5, 17, 18.5, 20, 21.5) inches / 32 (36, 39, 43, 47, 51, 55) cm
- Shoulder Width: XS (S, M, L, XL, 2XL, 3XL) = 19 (20.5, 22, 23.5, 25, 26.5, 28) inches / 48 (53.5, 56, 60, 63.5, 67, 71) cm
- Neckline Opening: XS (S, M, L, XL, 2XL, 3XL) = 4.5 (5, 5.5, 6, 6.5, 7, 7.5) inches / 11.5 (13, 14, 15, 16.5, 18, 19) cm
Abbreviations
- CO- Cast On
- RS- Right side
- WS- Wrong Side
- Rep- Repeat
- BO- Bing Off
- K- Knit
- P- Purl
- incr- Increase
- decr- decrease
- M1L- Make 1 left
- M1R- Make 1 right
- BOR- Beginning of Round
Pattern Notes
- If you want your cardigan to drop more, add more stitches when you cast on
- Only increase on the RS ( Right Side)
- Feel free to add more increases if you are not satisfied with the patterns. Wear the cardigan after you have connected the front and pack pieces and see how you feel.
- You do not have to follow the pattern word for word i.e, if you wish to have a different ribbing for the cuffs and bottom band, then do what you prefer.
- Block the cardigan before attaching the flowers.
Free Pattern: Flower Puff Cardigan XS-3XL
BACK
Using your 5.5 mm needles, CO 80 (88, 100, 114, 128, 142, 156) sts
Row 1 WS: P all sts
Row2 RS: K all sts
Repeat these two roes P on WS, K on RS till rows 41 (45, 49, 57, 65, 73, 81)
Put sts on stitch holder or scrap yarn (different color) cut off yarn
RIGHT FRONT
Pick up 26 (30, 34, 40, 46, 52, 58) sts from the right edge, Insert needle into the V shaped legs of the edge
ROW1 (WS): Pall sts
ROW 2 (RS): K all sts
ROW 3 (WS): Pall sts
ROW 4 (RS): K all sts
ROW 5 (WS): P asll sts
ROW 6 (RS): K to 3 sts before the end of the row, M1R, k3
ROW 7 (WS): P all sts
ROW 8 (RS): K all sts
ROW 9 (WS): P all sts
ROW 10 (RS): K to 3 sts before the end of the row, M1R, k3
Repeat rows (6-9), 8 (9, 10, 12, 14, 16, 18) more times,
In total, 9 (10, 11, 13, 15, 17, 19) sts were increased,
So that you have 35 (40, 45, 53, 61, 69, 77) sts on the needle.
Work a purl row
Put the sts on a holder, cut off yarn
LEFT FRONT
Pick up 26 (30, 34, 40, 46, 52, 58) sts start from the center going to the left edge.
Note that we only increase on the edge close to the collar (this will be at the beginning of the RS rows).
ROW1 (WS): Pall sts
ROW 2 (RS): K all sts
ROW 3 (WS): Pall sts
ROW 4 (RS): K all sts
ROW 5 (WS): P asll sts
ROW 6 (RS): K3, M1L, K the rest of the sts
ROW 7 (WS): P all sts
ROW 8 (RS): K all sts
ROW 9 (WS): P all sts
ROW 10 (RS): K3, M1L, K the rest of the sts
Repeat rows (6-9), 8 (9, 10, 12, 14, 16, 18) more times,
In total, 9 (10, 11, 13, 15, 17, 19) sts were increased,
Work a purl row
JOINING FRONT & BACK
Still working on left front, knit all left shoulder st, join to the back, k all sts of the back, join to the right front, k till end.
We are not done increasing.
Finish increasing on row 46 (50, 58, 62, 70, 78, 86) or till you are satisfied with the V opening then work in stockinet stitch till your cardigan reaches a few inches to where you want it to reach.
RIBBING
Switch to a 4.5mm knitting needle, work a 1X1 ribbing or your preferred ribbing till your desired length is achieved. I did 15 rows of 1X1 rib. At the end, BO.
SLEEVES
Starting from the underarm, pick up 56 (64, 70, 84, 98, 112, 126) sts
[28 (32, 35, 42, 49, 56, 63) sts from each side]
Place a marker for BOR.
- Rnd 1: k all sts
- Rnd 2 (decrease rnd): k2tog, k to last 2 sts, ssk → 54 (62, 68, 82, 96, 110, 124) sts
- Rnd 3-8: k all sts
Continue knitting, and at the same time, decrease every 8 (7, 6, 6, 5, 5, 4) rnds till it reaches where you want your cuff to begin.
CUFF
Switch to 4.5mm needles, k1, p1 ribbing until the cuff reaches the desired length.
For a neater look, match the cuff length to the cardigan’s ribbing.
Bind off.
Repeat for the second sleeve.
BUTTON BAND
Note that this is optional. I did not add buttons on mine because i was lazy and i do not use them anyway, but if you do, follow the steps.
Take your 4.5mm needles and your longest cable, pick up 5 sts, skip one, rep all around. Estimate where you want to place the button holes by placing stitch markers.
Work the collar placing the buttons holes in the easiest way you know how or follow THIS tutorial for guidance.
FINISHING
At the end, cut off the yarn leaving a tail long enough to weave in. Weave in all other ends. Block your cardigan then you are almost done!
CROCHET PUFF FLOWERS
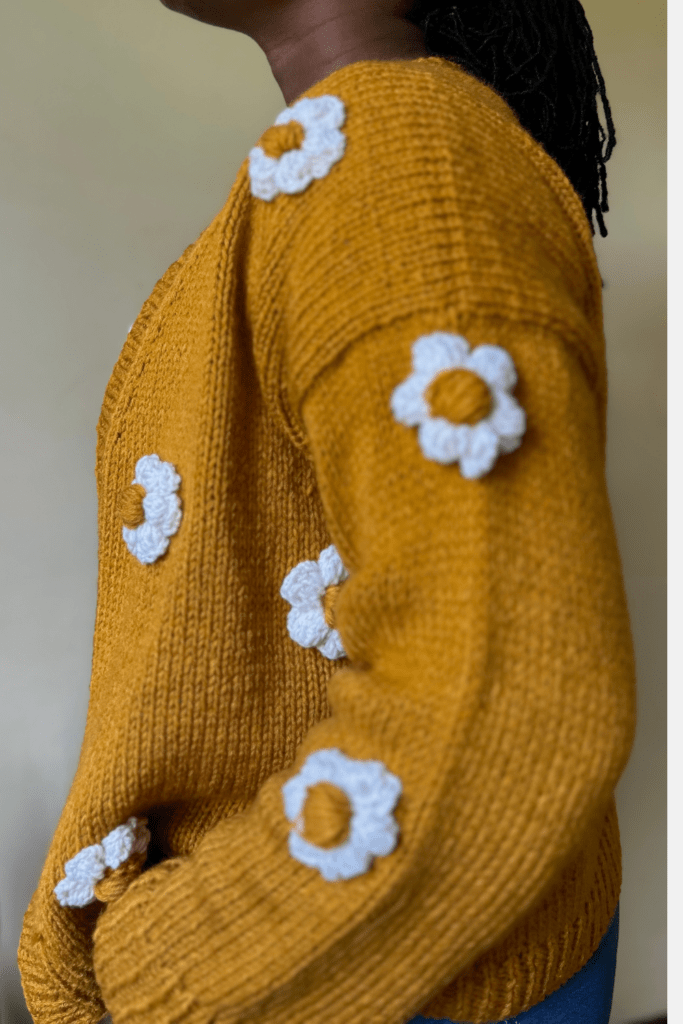
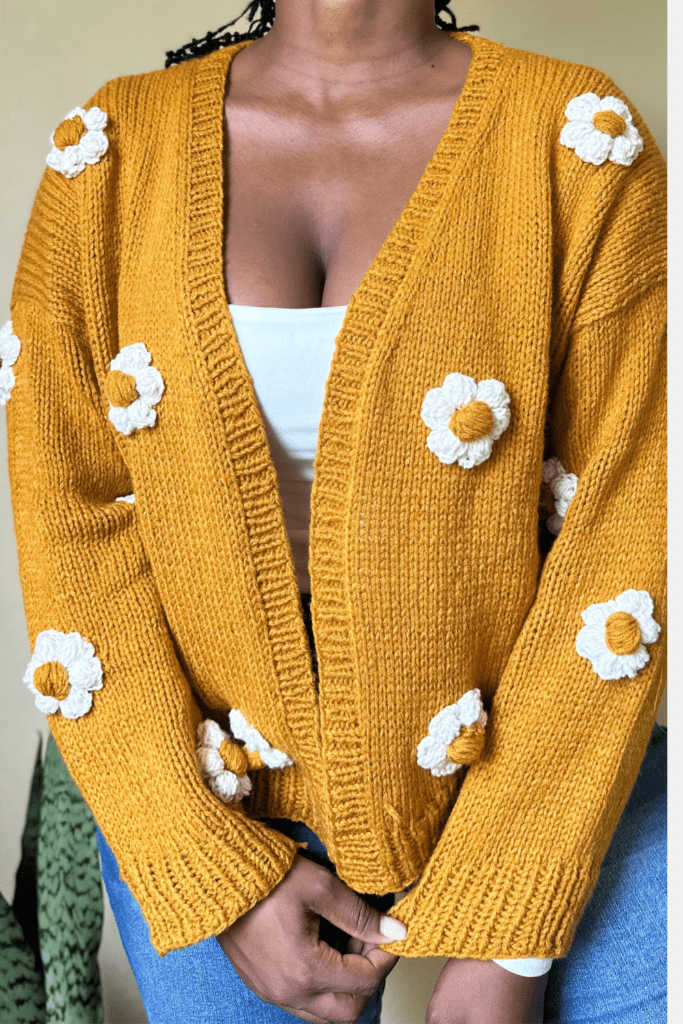
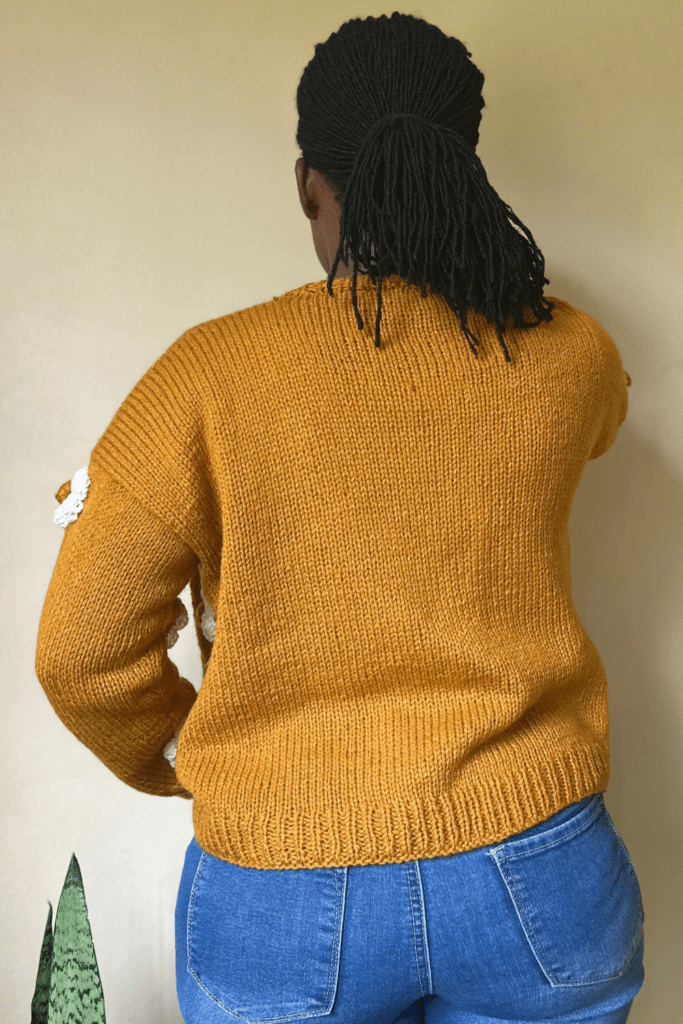
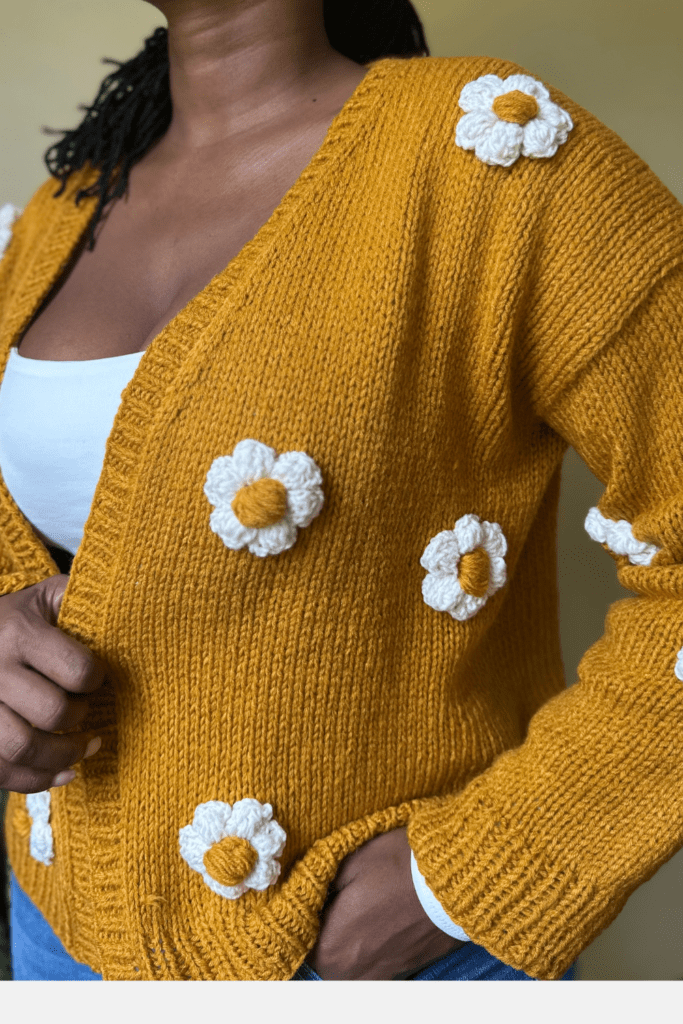
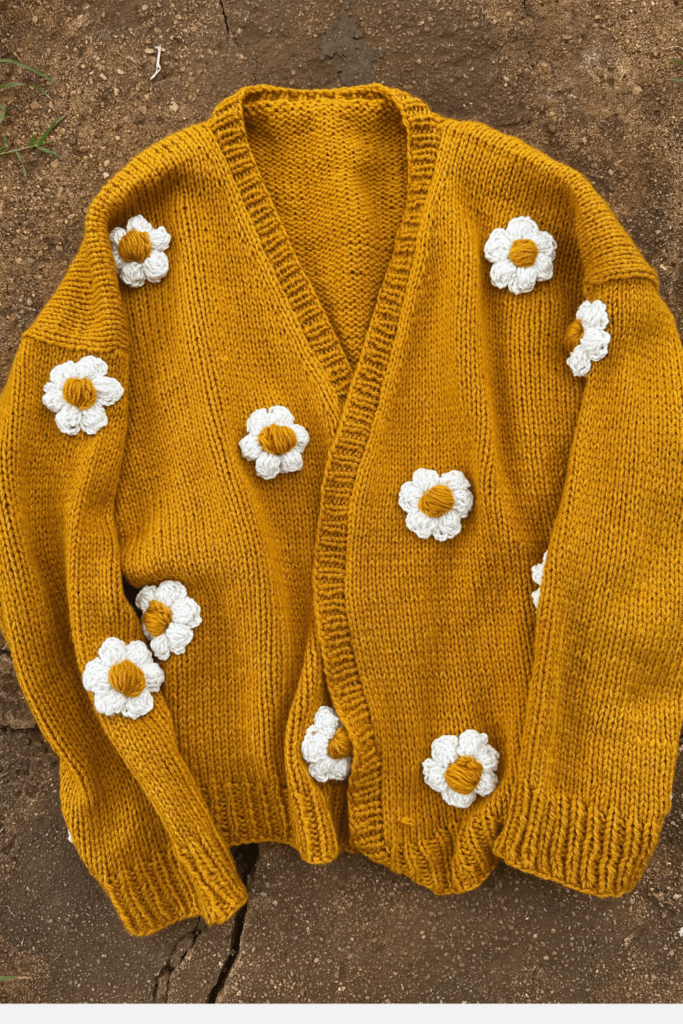
I made 8 flowers in total because i wanted 4 for each side of the cardigan and 4 for each arm. Note that the back does not have any flowers. If you wish to add flowers for the back then just make more and attach them there.
Watch THIS tutorial to know how to make the puff flowers. I used scrap yarn for the white petals and the cardigan yarn for the flower disk or center.
That is all for the cardigan! Enjoy it and tag me on Instagram @Sit_n_Crochet