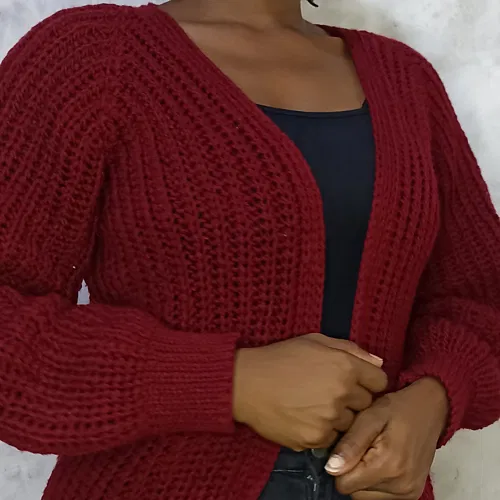
Hi there my crochet lovers, looking for something fast and easy to work up? Then look no further than this crochet cardigan free pattern!
In this article, i will guide you to crocheting this beginner friendly masterpiece that is so comfortable and beautiful!. It looks knit which is my absolute favourite part about this cardigan since i have spent all year trying to learn how to knit. Slowly we are getting there!
Free & Easy Crochet Cardigan Pattern
In my search for a quick and fun crochet project, i decided to design a cardigan that calls for minimal sewing! Yes, i hate sewing pieces together. I will admit that the crop ribbed cardigan was worked in pieces, it was my first and last! Never again!
So, this cardigan works in one big piece.(for the most of it). To be honest, i do not even remember using the yarn needle. The only sewing i did with this crochet cardigan was closing the arms. And that was a job my crochet hook did just perfectly fine!
This post may contain affiliate links, view the disclaimer policy
For the Ad-Free Printable PDF crochet Pattern, click here, Be sure to join our Facebook group, the family is slowly growing and we would love to have you. Follow us on Instagram and Pinterest too!!!
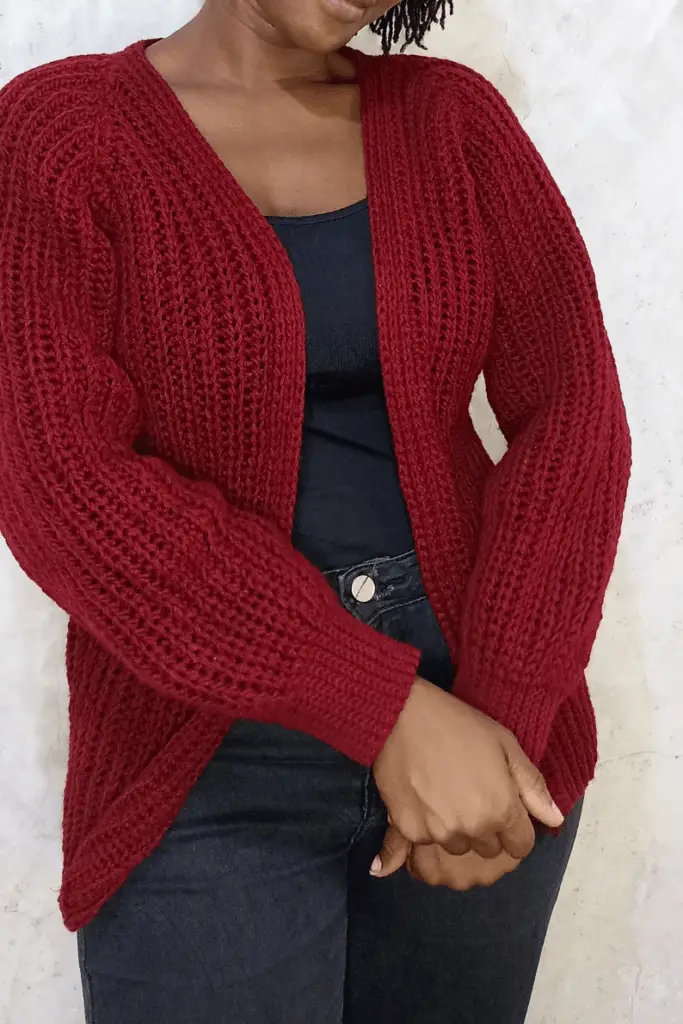
I had been thinking of crocheting this easy cardigan, but i always slept on the design until my friend pulled up with a knit cardigan exactly like this one. At first glance, i fell in love!!! And i told her i was going to make myself one in the exact color and design,
But as you know, i cannot knit to save a life. So we did what we do best and improvised with the crochet hook to get this crochet easy cardigan pattern. Trust me it is easy and it worked up pretty fast for me!!!!
sizes
XS, S, M, L, XL, 2XL, 3XL, 4XL,5XL
Gauge
17 stitches in 13 rows = 4X4
Materials
– DK weight yarn ( 100g balls)
– A ready you!!
amount of yarn needed
This pattern will not make a dent in your pockets so worry not. I used less yarn than i had anticipated surprisingly
I was using 100g balls of worsted weight yarn which is 230 yards.
XS- 4 balls of yarn
S- 4.5 balls of yarn
M- 5.5 balls of yarn
L- 6.5 balls of yarn
XL- 7.5 balls of yarn
2XL- 8.5 balls of yarn
3XL- 9.5 balls of yarn
4XL- 10 balls of yarn
5XL 11 balls of yarn
terminology
Ch- Chain
Hdslst- Half double slip stitch
slst- slip stitch
St- Stitch
Sc- single crochet
Rep- Repeat
Cont- Continue
Incr- Increase
Decr- decrease
Tog- together
Blo- Back loop Only
How to crochet an easy cardigan pattern
how to work the half double slip stitch
As said earlier, this is an easy pattern as long as you know how to increase and decrease you are set.
The only challenge i would assume you have however, may be the half double slip stitch, to work this, all you do is start off as if you are working a double crochet. So you will yarn over and insert your hook into the chain, grab the yarn and pull through so you have three loops on the hook. Instead of yarning over to finish as we would normally do with a half double crochet, slip stitch to finish with the third loop we pulled through.
front panel
R1: with your 5.00 mm crochet hook, ch: 76(86,96,96,106,116,116,126,136)
In the second ch from the hook, place a decr by hdslst 2 chains tog, hdslst going down but leave 15 ch un-worked. Work the 15 ch with a 3.5 mm hook. ( Be sure to place a stitch marker at the top of your row 1).
R2: Ch1, turn. Still with the 3.5 mm hook. Hdslst into the first 15st blo!!
At the stitch marker switch to the 5.00 mm hook and finish the row, placing another decrease at the top of your work.
Rep row 1-2 decreasing at the top of your work and in the blo till row 17(23,29,29,35,41,41,47,53)
You should end at the bottom of your work. Be sure to place a stitch marker at the top of your last decrease row so we do not miss it.
back panel
Start your next row as normal, at the top of the work, place an incr by placing 2 hdslst in the last st
Increase till row 17(23,29,29,35,41,41,47,53). You should end at the top of your work.
Place a stitch marker at the last row of your increase.
Work 17(23,29,29,35,41,41,47,53) normal rows. So you will not increase or decrease for these rows. Place a stitch marker on the top of the last normal row. You should have ended at the bottom of your work.
Now we start rows of decrease again.
Decr 17,23,29,29,35,41,41,47,53) rows remembering to leave a stitch marker at the top of your last row. You should have ended at the top of your work.
To start the last incr row which is back to the front panel now,
Ch 1 hdslst 2 into the first ch from hook to count as your first incr or you can ch 2 hdsldt into the second ch from the hook and that can count as your first incr.
Incr till row 17(23,29,29,35,41,41,47,53) Your work should have ended at the bottom. DO NOT CUT THE YARN
collar
We are gonna go around the collar working sc in every st.
So, ch1 with the 3.5 mm hook, place 15 sc then switch to the 5.00 mm hook and place a sc in each st. When you reach the top of the first front panel ch 4(4,6,6,8,8,10,10,12) and connect to the next st marker of the back panel which should be the stitch marker to the normal rows. Cont with the sc till the next stitch marker and ch 4(4,6,6,8,8,10,10,12) and connect to the other front panel. Finish by going down with your sc row switching to a 3.5 mm hook at the last 15 st.
Now to work the whole collar, use the 3.5 mm crochet hook and work your desired number of hdslst rows if you wish to do as i did, work 6 rows of hdslst.
By now, your work should be looking like a sleeve less cardigan..so on to the sleeves.
sleeves
Connect your yarn where you left the stitch marker which should be where your decrease and increase meet or your underarm section.
Place a sc in the first st and replace the st marker, place a sc in each hdslst row all the way around your arm opening slst to join in the first sc you made.
We still need the st marker, so remember the chains we made at the top of the shoulders? place the st marker in the middle of those ch. So you will place the st marker in the st number 2(2,3,3,4,4,5,5,6)
To start on the sleeve, ch 58(62,66,66,70,74,74,78,82) in the first 10 ch, with the 3.5 mm crochet hook place 10 slst leaving a marker on the 10th st, and switch to the 5.00 crochet hook and cont with the hdslst In the last ch of the sleeve, place 2 hdslst as an incr. slst to join the row in the next available sc, and slst in the next sc to start on the next row. one turn
Place 2 hdslst in the first ch to mark as an incr and work the rest of the ch as normal remembering to slst in the last 10 st eith the 3.5 mm crochet hook.
Cont to incr your sleeve till you reach the st marker we left at the shoulder as that should be half way through your sleeve meaning we should now start to decr.
To start the decr, work hdslst in 2 st tog. Rep this till your sleeve is complete, sew the sleeve close with your yarn needle.
Rep this for the other sleeve,
Your crochet cardigan is all done!!!
Weave in all the loose ends, try it on, go see how it looks in the mirror and post a picture in our Facebook group!!!!
Until next time, Happy crocheting.
Need to explain how to do the hdslst. Also correct the spelling errors. These errors are causing the pattern to have a conflict.
thank you for that, i have corrected the mistakes
This is a very pretty sweater. I am proficient at both knit and crochet. For the benefit of me and others who want to make this, would you please add yardage requirements for the sizes, and define the slip stitch half-double stitch?
I just finished a hat using YO slip stitch and it took me way too many hours. I found that stitch did not flow well – had to pinch the YO to get through it and it really slowed me down. I am hoping the stitch used here will be easier/quicker.
Thanks for a nice pattern.
Hi Marie, i have added the explanation to that.
As for me, i find turning the hook up side down to finish the YO helps and it works fast. I am addicted to that stitch as it looks close to knit
I am so sorry I just can’t follow the pattern.
When I saw easy in the title I thought it is for a medium crocheter, but I just get stucked. 🙁
Where are you stuck? i would love to help you
Hi! I love this sweater and want to start, but am not sure if I have enough yarn as you did not indicate what size ball of yarn used, just the number of balls. If you prefer not to say the brand could you just indicate the weight and length of the yarn balls used for this pattern?
Thank you!
Susan
Hi Susan, i have corrected that.
Hi! two – nope, three more questions:
collar: the first row of the collar is sc – the two sets of 15 sc with the 3.5 hook are part of the lower hem – are those BLO? Then, when working the 6 rows of hdslst with the 3.5 do you still BLO on the first and last 15 sts?
sleeves – the 10 st with the 3.5 hook are the cuff – are they really slst – and if yes, are they BLO? or are they hdslts – and if yes, are they BLO?
Looking at the other comments again – is the entire pattern BLO or just the bottom hem?
(OK, that’s 4, nope 5, 6 questions 🙂 ) Thanks!
What is the yardage of each ball of yarn??? You might want to add the yardage required to your instructions as yardage varies. 😀
thank you for that. i have added the yardage and the grams for the yarn balls
I have never heard of a hdslst – can you explain what it is please? Also hdsldt and dlslst ???
And do I understand that you work across the row in both loops on one row, then in BLO in the next row??
The 15 sts we make with smaller hook, they are the last 15 in the row, right?
i have added an explanation and a video explaining how to do the hdslst.
row one you are working in the foundation chain. the rows after that are all done in the back loops only to get the ribbed look.
yes, the 15 are the last ones that will form the bottom band
What size balls of yarn was used for this pattern please?
Nice pattern. What’s the total yardage need for a medium/ large? I want to make sure I have enough. Thank you
you should leave a drawing of what the sweater should look like as your instructions are not plain, I have been working and teaching for 60 years. Maybe getting old, ya yhink? Karen.
i really should have. will do that next time!
this is not plain at all, love looks but can’t work it outHELP karen
What can i help you with?