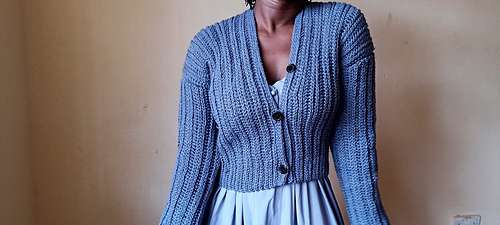
This ribbed crochet crop cardigan is just so annoyingly comfy and has the perfect fit. It sure will be your favourite crochet cardigan yet. And that wardrobe will be entering 2022 in style.
Find the the Ad-Free Printable PDF on Etsy, Ravelry, Lovecrafts or Ribblr , and browse through for other awesome crochet patterns we have to offer

This article may contain affiliate links, view disclosure policy
Easy Crochet Crop Cardigan
The ribbed crochet crop cardigan is everthing you would want your cardigan to be. The buttons add a modern finish to the knit look. Makes you think you can knit for a second.
Just in case you are unaware, we do update our patterns on Instagram and Facebook group, also pinterest, so be sure to follow and join us for quick updates

EASY CROCHET CROP CARDIGAN FREE PATTERN
I know i speak against working in panels and then sewing the part’s together, after this tutorial i swear to never do that again. It is tiresome. I have no idea what came over me. This is the first and last time we ever work a crochet cardigan in pieces!!! **SIGH**
The majority of this ribbed crochet crop cardigan pattern is made up of two base rows, where one consists of back loop slip stitches and the others back look half double crochet. I love the ribbed knit finish it gives.
We will alternate between these two stitches, and after a few repeats, this crochet ribbing stitch will become mindless and you can work it in your sleep!!
To achieve this knit look,we work our crochet crop cardigan from side to side, and at the same time working the bottom band which is just a switch from the normal stitches which are the slip stich and double rochet rows to a single crochet.
To achieve the best, be sure to stay relaxed and make sure to have the same guage as the written pattern for at most similar results.
So, just a quick disclaimer, i am from Malawi, so the yarn i use is from Zambia as that is what is readily available. When the website grows i will definitely start to order much better yarn.. However, i do my research and see what yarn you can use to get a much better higher quality finished results, that is why i leave the link to the yarn shops.
CROCHET CROP CARDIGAN CONSTRUCTION
The ribbed crochet crop cardigan is worked in 4 different panels, as i said earlier, never doing that again.
We will begin by working the back panel followed by the 2 front panels and finishing with the two sleeves.
The will all be connected together (TIRESOME!!!!!!) then the collar will be worked directly onto the cardigan followed by the sewing of the buttons to give that wardrobe an extra pop!
DESIGN INSPIRATION
I recently designed a crochet crop cardigan that was oversized and i just fell in love. Yes, i fall in love with all my crochet designs i will not life, but the love for this crochet crop cardigan was so big that i decided to make anotherone with a more fitted finish this time.
For the love of knit looked crochet patterns, all my patterns are crochet in the back loops to give that ribbed look a pop which is what results into the knit look finish.
Ever since i learnt this trick, i have not been able to let it go, i do not plan to do that any time soon either!!! I know you love the knit look finish too.
YARN
Alright, let us talk about the yarn for a second. As said previously, i am an African queen from the warm heart of Africa, Malawi, so the yarn i have here, is not available anywhere else, even if you wanted to order the yarn, i would not advice. The pattern calls for a worsted weight yarn, but i have no access to that, so i use two lace yarns to make a worsted weight yarn, i would advice you to get the worsted weight yarn using my affiliate link, it will take you to the home page where you can search fot the worsed weight yarn and pick your desired color.
The yarn we use calls for a 5.00 mm crochet hook which is perfecr for the recommended yarn of the pattern.
The pattern is written is size small worn by a 34.5″ bust model. However, the pattern contains 9 sizes
The sizing guide for this crochet pattern follows a size XS(S, M, L, XL, 2XL, 3XL, 4XL, 5XL) for example ch71(71,78,82,82,86,90,90,94) which means ch 71 for size XS, ch 71 for size small, ch 78 for Medium, ch82 for large etc….
NOTES
The entire pattern is worked in the back loops only
The chaining of one does not count as a stitch
The pattern uses US terminology
The ribbed part of the cardigan only switches to sc when it is a hdc row
LEVEL: Easy
GUAGE
10 cm/4″ square = 16.5 stitches wide x 21 rows tall ( 5 hdc rows + 16 slst rows)
MATERIALS
STITCH LIBRARY
Ch- Chain
Hdc- Half double crochet
Slst- Slip stitch
Sc- Single Crochet
Rep- Repeat
St- Stitch
RS- Right side
WS- Wrong side
BL- Back loop
RIBBED CROCHET CROP CARDIGAN PATTERN
BACK PANEL
FOUNDATION CHAIN: Ch as many as you wish. But if you wish to stick to the written pattern, ch 71(71,78,78,85,85,92,92,99).
ROW 1– Sc into the first 10 st, hdc in remaining st, at the end turn
ROW 2-4 Base slst row> Ch 1, BL only, slst across, slst in last st, turn
ROW 5– Base hdc row> Ch 1, BL sc in first 10 st, then hdc remaining st
Repeat rows 1-5 till your desired length. Or, if you are strictly following the patter, rep till rows 65(65,72,72,79,86,93,93,100) ch 1 and cut
FRONT PANEL (make 2)
Working the front panel, you will follow the pattern for the back panel we just made, only this time around you will work a total of 29(29,36,43,43,50,57,64,71) rows ch1 and cut
SLEEVES (MAKE 2)
For the sleeve, the number of ch to make can be optional. But if you are strictly sricking to the patter,
Ch 75,75,82,82.89,89,96,96,103) rep the same pattern as the back panel and the front panel for a total of 49(49,56,56,63.70,77,84,91) rows. Make 2 of each leaving a long tail to sew the sleeves to the body
CONNECTING
To connect the front panel and the back panel,lay the panels RS facing each other and seam them closed with the yarn needle. do this for both sides
To connect the sleeves, lay the work flat(see picture below for reference).
Fold your sleeve in half and place a stitch marker at the half mark, connect the st marker to the middle of the shoulder or where you sew the front and back panel.
Fold the work and turn it over so you are working with the WS, and sew he sleeve onto the rest of the body. close the sleeve so the WS is still facing you and sew the side closed, sew the cardigan side closed too. All of this is happen on the WS of the crochet crop cardigan.
Rep this for the other side
COLLAR
To work the collar, you want to go around the collar area and place a row of sc. this will help the slst rows to be worked on easily.
after the sc row, ch 1 and turn, work 3 rows of slst. place stitch markers where you want the button holes to be. whene you reach the st markers, ch 3 and slst into the 4th st after the st marker, rep this for all st markers.
Work another 3 slst rows making a total of 6 slst rows. Add the buttons opposite the holes you just made.
Cut and weave in all ends that we do not want and it looks like your crochet rinned crop cardiga is all finito!!! Gon on and try it on!!!
Did you like the pattern? Be sure to leave us a comment!!! Until next time, Happy crafting.

