Hi there, looking for something warm to wear this winter? Look no further than this crochet sweater turtleneck color-block sweater free pattern!
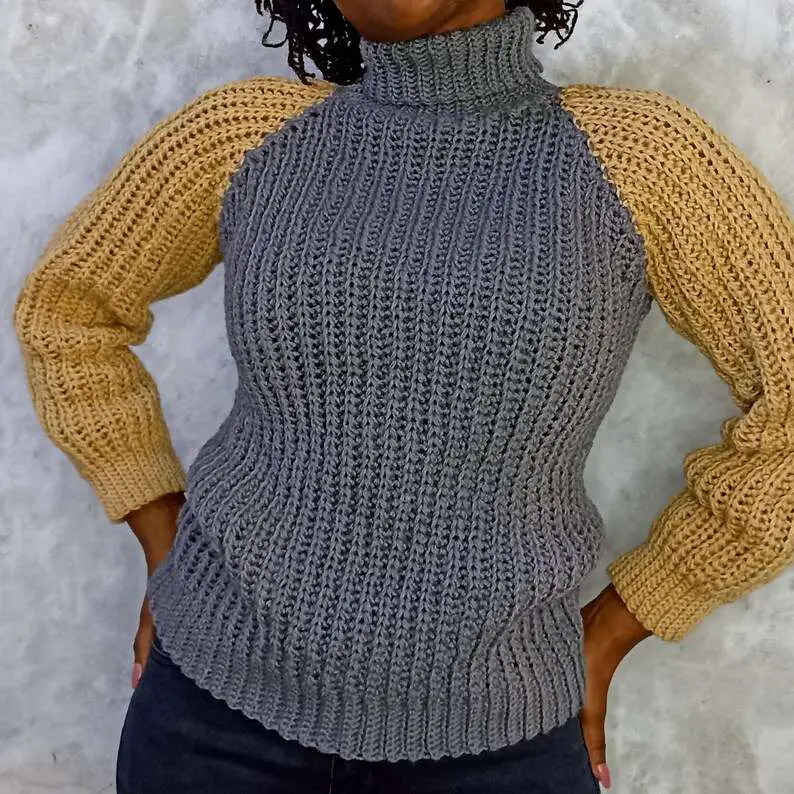
Back with another crochet turtleneck, this time we added the color block. I love playing with colors.
As usual, we have the Printable PDF Pattern also available on Ravelry. Together with other awesome patterns we know you will love.
Free Crochet Color Block Sweater Pattern
As you know, our Facebook group is always open for new members, why dont you join?
Follow us on Instagram while you are at it.
Pinterest too!!!

Some more of turning crochet into knitting, i thought i relive the crochet turtleneck sweater just with a color block feel this time around.
This crochet color block turtleneck sweater brings out the creator in you as it allows you to play with the design. Change the colors around as you wish. Make the collar longer or shorter. You are in charge.

crochet color block turtleneck sweater free pattern
Terminology: US
Level: Intermediate Beginner
Sizes: XS,S,M,L,XL,2XL,3XL,4XL,5XL
Guage: 12 hdslst n 10 rows= 4”

Notes
– The pattern is worked in the back loop only to achieve the knit look
– We begin by making the neck then the body
– Chin 1 does not count as a stitch
– The pattern has 9 sizes written as XS(S,M,L,XL,2XL,3XL,4XL,5XL)
Yarn Needed
XS 5 balls of grey yarn . 2.5 balls of the secondary colour
S; 6 balls of yarn 2.5 balls of the secondary colour
M: 7 balls of yarn 3 balls of the secondary colour
L: 8 balls of yarn 3.5 balls of the secondary colour
XL: 10 balls of yarn 3.5 balls of the secondary colour
2XL: 12 balls of yarn 3.5 balls of the secondary colour
3XL: 13 balls of yarn 3.5 balls of the secondary colour
4XL: 14 balls of yarn 3.5 balls of the secondary colour
5XL: 15 balls of yarn 4 balls of the secondary colour
You may have some yarn left over.
Materials
Collar:
This part can be to your desired length. Chain more or less if you will.
Row 1: Ch 41(41,41,41,47,47,47,47,51) into the second st from the hook, slst. Slst all the way down and ch 1 and turn.
Row 2: slst into the back loops only into all the stitches.
Repeat rows 1-2 till rows 60(60,80,80,120,120,140,140,160) close the collar with your yarn needle.
You will notice that there are stitch markers on the collar, after you have finished your rows, ch 1 and work 1 sc into every row so at the end you should have 60(60,80,80,120,120,140,140,160) sc. do a ch 1 and cut.
For size XS and S, Place your stitch marker into the 10th, 30th, 4oth,60th stitch.
For size M and L, place your stitch marker in the 10th, 40th, 50th, 80th stitch.
For size XL and 2XL place your stitch marker in the 20th, 60th, 80th, 120th stitch.
For size 3XL and 4X, place your stitch marker in the 20th, 70th,90th, 140th stitch.
For size 5XL place your stitch marker in the 20th, 80th,100th, 160th stitch.
body
The crochet colour block turtle neck sweater can be made longer or shorter depending on your liking, so you can make the chains here as long or short as you wish.
Row 1: Ch 61(61,71,71,81,81,91,91,101) sc into the first 10 st and place a stitch marker in the 10th st. Hdslst in the remaining st, incr in the last st by placing 2 hdslst in the same st.
Row 2: Ch 2 and turn, hdslst in the second st from the hook to mark as an increase for row 2.
NOTE: Work on the back loops only from here onwards. Hdslst in the remaining st till the stitch marker, sc in the last 10 st.
Repeat rows 1-2 till row 19(19,25,25,31,31,37,37,43) You should end at the top of your work.
Now connect the body to the collar with a slst. You will connect to the last stitch marker we placed which should be a space of 20(20,30,30,40,40,50,50,60) stitches. Slst into the next sc to start the next row.
You should have slst into 2 sc of the colar now.
We will do no more increases for the middle portion but rather work normal rows. Turn your work and work downwards with the hdslst, switch to sc when you reach the stitch marker.
Repeat this till you reach the next stitch marker of the collar.
From here on we will start to decrease the same number of rows we increased on the opposite side.
Instead of connecting to the collar with a slst, we will ch 1, turn the work and do a decrease od two st together. So you will hdslst 2 together.
Repeat this for the same number of rows you increased. 19(19,25,25,31,31,37,37,43)
At the end of the row, ch 1 and cut.
Repeat this for the other middle portion leaving the shoulder portions untouched.
Connect the yarn at the under arm portion of where the sleeve should be, and place sc all around the arm. Be sure to keep the same number as rows we made. so for size small you should place 48 sc.,(48,60, 60,82,82, 94,94, 106)
Place a stitch marker at the center of the shoulder stitches to indicate the middle of your sleeve. Place the stitch marker in sc number 5(5,5,5,10,10,10,10,10)
sleeves (make 2)
For the sleeve, you want to make sure your sc ends back at the under arm section, you will slst into the first sc you made, and make a ch of 61(61,81,81,121,121,141,141,161). Using your secondary colour.
Begin with sc into 10 st, place a stitch marker and hdslst into the remaining st. In the last st, make an increase of 2 hdslst in the same st. Slst to the next sc to connect the row, slst to the next sc to start a new row.
Turn your work, in the first st, increase by placing 2 hdslst together.
Repeat these 2 rows, increasing at the top of the work for each row till you reach the stitch marker.
Place your last increase in the stitch marker, from there, decrease. Decrease by working 2 hdslst together.
We increase for half of the sleeve then decrease for the other half.
Repeat this till your sleeve is done, connect the sleeve by sewing with your needle.
Repeat this for the other side and your crochet turtleneck sweater pattern is almost done.
What’s left? Cut off the excess yarn and weave in the ends. And your crochet turtleneck sweater pattern is all finito.
Go on and try it on, tell us what you think in the Facebook group!!!