If you crochet but do not own one of these easy crochet oversized cardigans, then we need to remedy that right away. This crochet cardigan can be styled in so many ways as well as a long day on the couch crocheting. It is very comfortable.
I always frog my work to re use the yarn because i need to make more crochet projects to keep you lovely people here, but this one crochet cardigan stayed intact.
As always, you can find the Ad-Free printable PDF pattern HERE.

How to crochet the easiest oversized cardigan
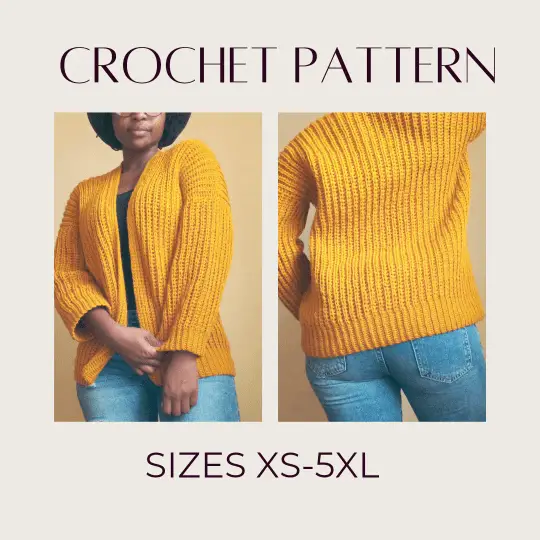
The sunshine crochet oversized cardigan is everything you would want your cardigan to be. Cozy, classy and sassy. This oversized crochet cardigan will give your wardrobe a boost as it can rock a dress and pants viciously.
What makes this crochet cardigan the easiest, is the fact that we work the whole cardigan body in one piece. We then close the shoulders and work the sleeves onto the body of the cardigan to reduce sewing pieces together.
The collar is also worked onto the cardigan body, then we cut the yarn, and weave it in!
Let’s get social
When i postend the sunshine crochet cardigan on the Facebook group, a lot of people loved the result to i decided to share the free written pattern. Our Pinterest is constatly updated. Be sure to follow us there!
Most were so sure it was knit, and to the beginner eye you would think the same.
Personally i love the stitch because it looks knit. But, it is all crochet.
The entire crochet oversized cardigan is worked up using the half double slip stitch only. That is what gives it the knit finnished look even though it clearly is a crochet cardigan!!!
Download the Ad-Free Printable PDF pattern
STITCH LIBRARY
-Hdslst- Half Double Slip Stitch
-Ch- Chain
-Bl-Backloop
-St- Stitches
-Rep- Repeat
MATERIALS
6.00 mm Hook
Stitch marker
Yarn
Measuring tape
Scissors
Darning needle
AMOUNT OF YARN NEEDED
5 balls of 100g yarn suitable for 6.00 mm hook for sizes XS & S,
7 balls for size M,
9 balls for L,
11 balls for XL,
13 balls for 2XL,
15 balls for 3XL,
17 balls for 4XL,
19 balls for 5XL.
GOOD TO KNOW
The pattern for the cardigan is worked from bottom to the top and not side to side in order to achieve the knit look. Take note that the pattern is worked in the back loop only throughout. The cardigan is worked using half double slip stitch throughout even in the collar, we just change the hook size. The pictures presented were in size small. Note that you can adjust the pattern to the size you want by either adding or removing rows incase the pattern is too oversized for you or you would like it to be slightly more oversize. Note that chaining of one does not count as a stitch.
MEASUREMENTS
Finished work Measurement for size S : Length : 25.5 inches Wide: 28 inches
Gauge: 16 stitches in 14 rows 4”X4”
SIZES: SX, S, M, L, XL, 2XL, 3XL, 4XL, 5XL
TERMINOLOGY
US
DIFFICULTY
Intermediate Beginner
CONSTRUCTION
Crochet is beyond my hobby, i am addicted. But, there are sides to it that i hate, which is the sewing pieces together part, so i do my best to avoid the sewing LOL! So, this cardigan is worked in one piece, (well, the arms excluded but trust me you will only need your needle to connect the shoulders, close the arms and weave in the ends.
This pattern can be worked by a beginner, the only new thing would be the half double slip stitch stitch. It is a very easy pattern because trust me, we use the same stitch throughout with the addition of a single crochet which will be optional and slipstitch to connect the arms to the body.
Just a quick overview of how the cardigan will be brought to life, we will start by making one front pannel which will then be extended to the back panel by chining the armhole then we will end with the other front panel. Connecting the shoulders then we will work the arms on the body so we eliminate the sewing LOL.
Just a quick overview of how the cardigan will be brought to life, we will start by making one front pannel which will then be extended to the back panel by chining the armhole then we will end with the other front panel. Connecting the shoulders then we will work the arms on the body so we eliminate the sewing LOL.
SIZING GUIDE
The sizing guide follows size XS(S, M, L, XL, 2XL, 3XL, 4XL,5XL) E.g. “Ch 41(41, 45, 45, 49, 49, 53, 53,… ) means Ch 41 for XS, Ch 41 for Small, Ch 45 for Medium, Ch 45 for Large, Ch 49 for XL, Ch 49for 2XL, Ch 53 for 3XL, Ch 53 for 4XL… etc
PATTERN
FRONT PANEL
Begin by estimating how long you want your cardigan to be by measuring from where you want your cardigan to reach to the top of your shoulder. if you want to make the exact same one as i did, then you can follow the numbers below.
To begin, Ch 81(91,101,111,121,131,141,151,161)
R1: Using a 4.00 mm hook, hdslst into the first 10 st and place a stitch marker on the 10th stitch. Switch to a 6.00 mm hook and proceed with the hdslst till the top. Ch1 and turn.
R2: Hdslst all the way down witht the 6.00mm hook in the back loop only tilll you reach the stitch marker, switch to a 4.00 hook for the last 10 st. Ch 1 and turn
R3: Hdslst into the first 10 st with the 4.00 mm hook up to the stitch marker, the switch to a 6.00mm hook, proceed to hdslst all the way to the top. Repeat rows 1-3 till rows 26(30,38,46,54,62,70,78,86) You should end at the bottom of your work.
Begining the back pannel we should all be at the bottom of our work, start the row as normal with a 4.00 mm hook switching to the 6.00 mm hook after the stitch marker, however, leave a total of 20(25,30,35,40,45,50,55,60) stitches unworked at the top and make a chain of 21(26,31,36,41,46,51,56,61)
BACK PANEL
R1: This will be considered row 1 of the back pannel. Into the second stitch from the hook, Hdslst all the way down witht the 6.00mm hook in the back loop only tilll you reach the stitch marker, switch to a 4.00 hook for the last 10 st. Ch 1 and turn
R2: Hdslst into the first 10 st with the 4.00 mm hook, switch at the stitch marker to a 6.00mm hook, proceed to hdslst all the way to the top. Repeat rows 1-2till rows 26(30,38,46,54,62,70,78,86) You should end at the top of your work.
Since this is an oversized cardigan, we will work a middle portion to help the cardigan fall off our shoulders a bit more. work 6(10,10,16,16,22,22,22,26,) extra rows for the mid section, and finalize the back pannel by working a another 27(31,39,47,55,63,71,79,87) we should be at the bottom of our work. begin the next row as normal but however, leave a total of 20(25,30,35,40,45,50,55,60) stitches unworked at the top and make a chain of 21(26,31,36,41,46,51,56,61)
Hdslst all the way down witht the 6.00mm hook in the back loop only tilll you reach the stitch marker, switch to a 4.00 hook for the last 10 st. Ch 1 and turn. Repeat this till rows 26(30,38,46,54,62,70,78,86) ch1 and cut.
Fold the cardigan so the front pannels lay on the back pannel to sew together. Sew the shoulders together neatly. To begin working in the arms,
SLEEVES (MAKE 2)
To begin working in the arms, go around the arm hole with a row of single crochet(optional as it is easier to see the stitches, but if you can see them without the single crochet row then skip this phase), connect the yarn to the underarm of the cardign and ch51(51,61,71,81,91,101,111.121). hdslst with a 4.00mm hook the first 10 stitches placing a stitch marker and proceeding with a 6.00 mm hook. when you reach the under arm portion, connect to the next st /single crochet st with a slip stitch to join the row, slst to the next st/single crochet st to begin a new row. hdsldt in the back loop only. repeat this till the whole arm is complete then sew the arm to close it. Repeat with the other side.
COLAR
To work the color, we will only be using the 4.00 mm hook for this part. this part is optional but i recomend it for absolute beginners. connect your yarn and Work a row of single crochet around the colar area of the cardigan to make the stitches more visible. Note, for the mid section we did on the back pannel, place 1 single crochet into each hdslst row At the end of your single crochet row assuming you did not skip this row, Ch 1 and hdslst all the way around, when you reach the end, ch1 and turn. The thickness of your color is optional, so work as many rows as you wish, as for me, i worked 6 rows. At the end, chain 1 and cut. Weave in all the ends, and yout Sunshine Cardigan is all DONE!!!
If you loved the pattern, be sure to subscribe to the newsletter list so you do not miss out on other patterns to come. And be sure to leave a comment down below.