If you are in search for some DIY Christmas tree decorations, then you will love this Crochet Snowflake Free Pattern!
Crocheting your own Christmas tree ornaments is a perfect way to start some handmade Christmas traditions. I love that ornaments are so versatile. You can use them to decorate your tree, string them on your mantle, or even attach them to your Christmas gifts.
Grab the Ad-Free Printable PDF Crochet Snowflake Pattern HERE.
(Love to crochet everything from sweaters , cardigans to blankets besides toys? Check out our crochet pattern shops on Ribblr, Lovecrafts, and Ravelry)
Snowflake Crochet Pattern
If you love to decorate your home and tree with Christmas ornaments then pulling them out to decorate your tree must be an exciting time for you.
Christmas ornaments can be a big part of the homey, cosy Christmas memories that we make year after year with our families and friends.
And what could be more memorable than making your own crochet snowflake Christmas ornaments?
Since it is the gifting seasons, the crochet snowflake takes under 20 minutes to make, so you can make a handful and gift them to your loved ones to brighten up their homes! Or, if you’re looking to make a little something, add a price to them and watch them sell like hot cake!
Make some for your local Christmas craft fair, give them out at work, or even consider adding them as a special touch to your purchased gifts.
Favourite Crochet Supplies
Here are the best supplies to use for your crochet snowflake.
- Yarn: Opt for white yarn in a fingering weight for the snowflake. Feel free to make the snowflakes in any colour you want for a touch of creativity.
- Scissor– To cut off the yarn when you are all done
- Crochet Hook: Choose an appropriate hook size to match your yarn weight.
Best Yarn For Crochet Snowflake
Christmas ornaments are pretty forgiving when it comes to yarn choice. Because size doesn’t matter too much, you don’t need to worry about your gauge for most patterns.
For this Christmas snowflake crochet pattern, you can use any yarn weight you want as long as you know that the bigger the yarn, the bigger the snowflake.
More Christmas Crochet Patterns
Looking for more Christmas crochet patterns? Check out the posts below for lots more ideas!
15 Crochet Christmas Ornament Patterns
Crochet Snowflake Pattern
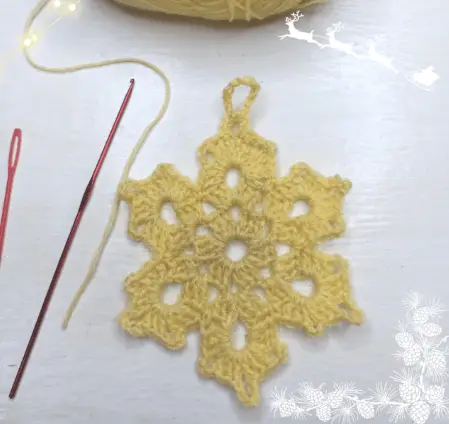
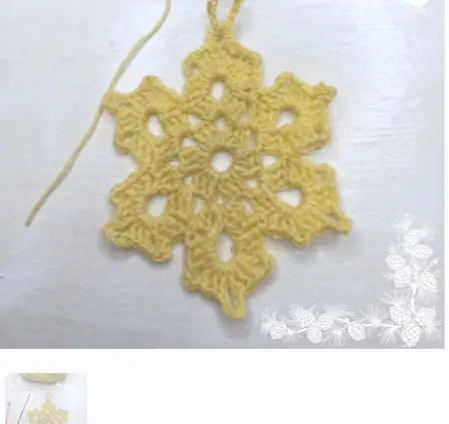
Now enough with the chit chat, let’s get down to the actual crochet snowflake pattern.
Measurements
From top to bottom : 14.7cm
Side to side: 3.8
Abbreviation
| ch | Chain |
| dc | double crochet |
| rep | repeat |
| sc | single crochet |
| sl st | slip stitch |
Notes
- Ch 3 counts as a stitch
- You can use whatever size yarn you wish
PATTERN
- Ch 7, slst
- 1ch 3, 2dc, ch 3, 3dc, ch3 ( rep 5 times) slst
- 2slst to the ch 3 space, ch3, 2dc, ch 5, 3dc in same ch 3 space, ch 1.
- Into the next ch 3 space, 3 dc , ch 5, 3dc, ch1. Rep 5 times, slst
- 3slst to the ch 5 space, ch 3, 2dc, ch 3, 3 dc, ch 5, 3dc, ch 3, 3 dc. Sc into the previous ch 1 space. Rep this all the way around. Slst to the ch 5 space, ch 10, slst to connect, ch 1, cut yarn and weave in ends,
- You are done! Make a few more and your Christmas decoration is all set!
You have completed this pattern!
How to stiffen a crochet snowflake
Crocheting delicate snowflakes can be a labour of love, but ensuring they maintain their intricate shape is equally important.
Stiffening your crochet snowflakes not only preserves their delicate charm but also allows you to display them with pride.
Whether you’re a seasoned crocheter or new to the craft, here’s a step-by-step guide on how to stiffen your crochet snowflake.
Choose Your Stiffening Agent
Before you start the stiffening process, you’ll need to select a suitable stiffening agent. There are several options available, each with its own merits:
- Starch Solution: A common choice, starch can be mixed with water to create a solution that stiffens your snowflake. It’s easily accessible and provides a moderate level of stiffness.
- Sugar Solution: A mixture of sugar and water can be used to stiffen snowflakes. This option is ideal if you’re looking for a slightly stiffer result with a subtle sheen.
- Glue Mixture: A mixture of white glue and water can provide a strong hold, making it suitable for intricate or larger snowflake designs.
- Commercial Fabric Stiffeners: You can also find specialised fabric stiffeners in craft stores. These are formulated to provide a consistent level of stiffness and are convenient to use.
Prepare your snowflake
Once you’ve chosen your stiffening agent, it’s time to prepare your snowflakes:
- Clean Your Snowflakes: Ensure that your crochet snowflakes are clean and free from any dust or debris. Gently shake or blow on them to remove any loose particles.
- Block Your Snowflakes: If your snowflakes are not already blocked (shaped to their final design), now is the time to do so. Gently stretch and shape each snowflake using pins on a blocking board or a foam surface.
Stiffening Process
- Dip or Brush: Depending on the stiffening agent you’re using, either dip your snowflake into the solution or gently brush the solution onto the snowflake’s surface. Make sure to saturate the entire snowflake evenly.
- Remove Excess: Gently squeeze or shake the snowflake to remove excess solution. Avoid wringing or twisting, as this can distort the delicate design.
- Shape and Dry: If you want a flat snowflake, place it on a parchment paper-covered surface to dry. If you desire a three-dimensional shape, place the snowflake over a mold (e.g., a glass or bowl) that matches the desired curvature. Allow the snowflake to dry completely.
Final Touches
Once your snowflakes are dry, you can add a few final touches to enhance their appearance:
- Glitter or Spray: If you want to add a touch of sparkle, you can lightly spray your snowflake with glitter spray or apply a thin layer of glitter using a soft brush.
- Remove Pins: If you used pins for blocking, carefully remove them once the snowflake is fully dry.
Caring for Crochet Snowflakes as Timeless Christmas Decorations
Crochet snowflakes, with their delicate beauty and intricate designs, can become cherished heirlooms that adorn your Christmas decorations for years to come.
To ensure these intricate creations retain their charm and integrity, proper care is essential. Here’s a comprehensive guide on how to care for your crochet snowflakes to keep them looking enchanting season after season.
Handling with care
- Clean Hands: Always handle your crochet snowflakes with clean hands to avoid transferring oils, dirt, or debris onto the delicate fibers.
- Gentle Touch: Treat your snowflakes with a gentle touch. Avoid tugging, pulling, or bending the delicate threads, as these actions can distort their shape and design.
Display and Storage
- Avoid Direct Sunlight: While crochet snowflakes can bring sparkle to your Christmas decorations, avoid exposing them to direct sunlight for prolonged periods. Sunlight can cause fading and weaken the fibers over time.
- Moisture Control: Keep your snowflakes away from areas with high humidity, as moisture can lead to mold and mildew growth. If you live in a humid environment, consider using a dehumidifier.
- Display: When displaying your crochet snowflakes, choose areas that are sheltered from dust and potential spills. Hanging them on a Christmas tree, in windows, or on a mantel can add an elegant touch to your décor.
- Storage: During the off-season, store your snowflakes in a cool, dry place. Avoid storing them in attics, basements, or areas prone to temperature fluctuations.
Cleaning and Maintenance
- Dusting: Periodically dust your crochet snowflakes with a soft brush or a can of compressed air. Gently brush away any dust that may have settled on the surface.
- Storing Individually: To prevent tangling and damage, store each snowflake separately in acid-free tissue paper or a soft fabric pouch. This helps maintain their shape and prevents friction between delicate fibers.
Repairing and Restoration
- Minor Repairs: If you notice loose threads or minor damage, use a tiny crochet hook or a thin needle to carefully weave the threads back into place. Avoid pulling too tightly, as this can distort the design.
- Restoration: If a snowflake sustains significant damage, consider taking it to a professional crocheter or textile conservator for restoration. They can skillfully repair and reinforce the delicate structure.