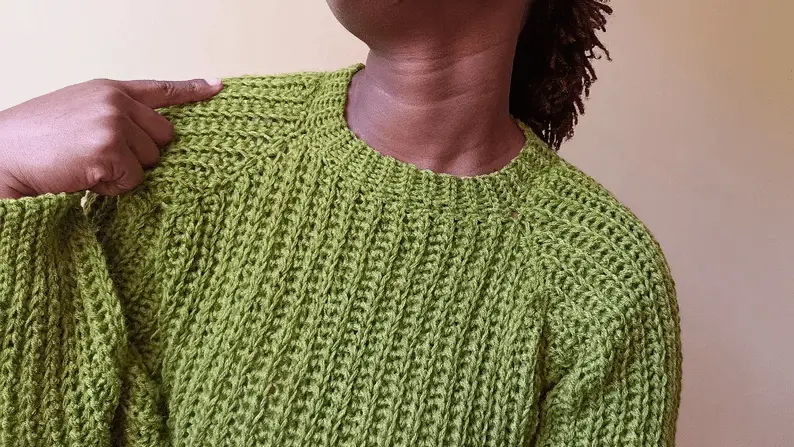
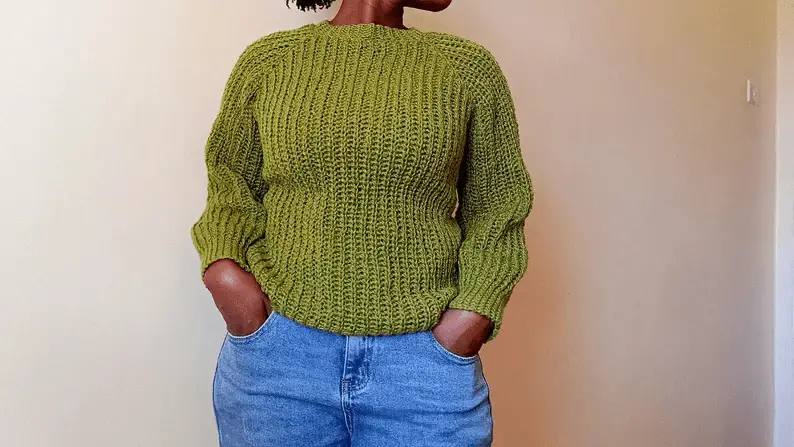
For the love of knit sweaters, i made this crochet fisherman sweater. Before you say anything, yes, it is crochet and not knit.
For the free crochet sweater pattern, scroll down below.
This fisherman sweater is available in PDF Format on Etsy and Lovecrafts, if you prefer that to the Ads on this free sweater pattern, then visit that, It is very affordable.
Easy Crochet Fisherman Sweater Pattern
This crochet fisherman cardgian can be called a beginners sweater project. If you are comfortable crocheting a sweater or cardigan then you sure can attempt this sweater.
It does call for some increasing and increasing mostly so be sure tyou are comfortable with that.
It has come to my attention that a lot of people do not know how to work the half double slip stitch, so head HERE for the tutorial then come right on back to this sweater pattern.
I recetly made a fisherman crochet cardigan, it is up to now my favorite cardigan after my sunshine oversized cardigan. If you are obsessed with the fisherman knit design, then you will sure love the cardigan.
Best Yarn For A Crochet Sweater
I personally believe good yarn make a sweater look even better. And when you have committed to crocheting a sweater, you want to commit to the best yarn.
I worked this fisherman sweater using DK weight yarn, and i will lead you to the best DK yarn you can use to make this crochet fisherman sweater. However, if you already have a stack of yarn somewhere that was looking for a project, then use that.
Mary Maxim’s Mellow Spun DK yarn might just be the perfect yarn for this winters fisherman sweater.
Can a beginnerf crochet a sweater?
Yes. The basic crochet skills you learn i.e increasing, decreasing are what you need for this sweater. The only new thing might be the knit look stitch that is used to achieve the knit ribbing look. But that can only take you 10 minutes to learn and master.
Crochet Fisherman Sweater Inspiration
Did i mention i cannot knit to save a life? So they say fake it till you make eit right? The inspiration for this knit look crochet sweater was my obsession for knitting. It took me a month tops to learn the basic crochet skills and start to attempt to make little crochet projects like crochet sandals and some crochet tops, i know the frustration it brings so the fear of that is what pulls me back.
However, with the new year approaching, it is the best time to learn new hobbies. So expect to see some knit patterns here next year
Construction
Just to give you a quick summary of how we are going to work this sweater.
1. Neck
We will begin by making a chain of 6 and slip stitching back and forth into the back loops to give the ribbing knit look
2. Body
We will start working the underarm section of the sweater where we will do rows of increasing, once we have the required number of rows, we will then work the rest of the body of the sweater, connecting to the collar as we go. The front and back body portion will all be worked in the same panel. Aim is to reduce sewing because we hate doing that.
3. Sleeves
With the whole body and collar all done, we will then connect to the yarn under the arm or in the armpit section and make a chain the length of the arm, going back and forth with the sleeve, increasing at the base, we will be working the sleeve onto the body of the sweater as we did with the collar. This will be repeated for the other side.
All done.
Notes
The pattern is worked in the back loop only to achieve the knit look
- We begin by making the neck then the body
- Chin 1 does not count as a stitch
- The pattern has 8 sizes written as XS(S,M,L,XL,2XL,3XL,4XL,)
Yarn Needed
S; 8.5 balls of yarn
M: 10 balls of yarn
L: 11.5 balls of yarn
XL: 13 balls of yarn
2XL: 15 balls of yarn
3XL: 16.5 balls of yarn
4XL: 17.5 balls of yarn
5XL: 19 balls of yarn
Stitch Library
Ch- Chain
Sc- Single crochet
Slst- Slip stitch
Hdslst- Half double slip stitch
Rep- Repeat
Incr- Increase
Decr- Decrease
St- Stitch
Materials
DK weight yarn
4.00mm & 5.00mm crochet hook
Stitch markers (a lot)
Scissors
Yarn needle
CROCHET FISHERMAN SWEATER FREE PATTERN
Collar
This part can be to your desired length. Chain more or less if you wils
Row 1: Ch 6, into the second st from the hook, slst. Slst all the way down and ch 1 and turn.
Row 2: slst into the back loops only into all the stitches.
Repeat rows 1-2 till rows (60,80,80,120,120,140,140,160)
Ch 1 and work 1 sc into every side slst row so at the end you should have
60(80,80,120,120,140,140,160) sc. do a ch 1 and cut
SEPARATING THE COLLAR TO BODY PANELS
You will need 4 stitch markers for this to mark the shoulders, back and front panel of the
sweaters.
Place the first stitch marker anywhere.
Then count 10(10,15,20,25,25,30) stitches including the one with the stitch marker, place
another stitch marker. That will mark your first arm or shoulder section.
For the next stitch marker, Count 20(30,35,40,45,45,50) stitches, place the stitch marker.
This will be the front of your sweater.
For the third stitch marker, count another 10(10,15,20,25,25,30) and place the stitch marker.
You should have 20(30,35,40,45,45,50) between the last stitch marker and the first stitch
marker.
Put the collar aside.
BODY
The turtle neck sweater can be made longer or shorter depending on your liking, so you can
make the chains here as long or short as you wish.
Row 1: Ch 61(71,71,81,81,91,91,101) sc into the first 10 st with a 4.0 mm hook and place a
stitch marker in the 10th st. With the 5.00mm hook, Hdslst in the remaining st, incr in the
last st by placing 2 hdslst in the same st.
Row 2: Ch 2 and turn, hdslst in the second st from the hook to mark as an increase for row
2.
NOTE: Work on the back loops only from here onwards.
Hdslst in the remaining st till the stitch marker, sc in the last 10 st with the 4mm hook.
Repeat rows 1-2 till row 19(25,25,31,31,37,37,43) You should end at the top of your work.
Now connect the body to the collar with a slst. You will connect to the last stitch marker we
placed or the front body part of the collar (the part with the most stitches)
When you slst to one sc, you are joining the row you just worked, when you slst to the
next sc, it acts as a ch 1.
Slst into the next sc to start the next row. You should have slst into 2 sc of the colar now.
We will do no more increases for the middle portion.
Turn your work and work downwards with the hdslst, switch to sc when you reach the stitch
marker. Repeat this till you reach the next stitch marker of the collar.
From here on we will start to decrease the same number of rows we increased on the
opposite side.
Instead of connecting to the collar with a slst, we will ch 1, turn the work and do a decrease
of two hdslst together.
So you will hdslst 2 together. Repeat this for the same number of rows you increased.
19(25,25,31,31,37,37,43)
At the end of the row, ch 1 and cut.
Repeat this for the other middle portion of the collar, leaving the shoulder portions
untouched.
When you are done, connect the sides and close the collar using your yarn needle.
Connect the yarn at the under arm portion of where the sleeve should be, and place sc all
around the arm. Be sure the number of sc matches the number of rows.
Place a stitch marker at the centre of the shoulder stitches to indicate the middle of your
sleeve. Place the stitch marker in sc number 5(5,5,10,10,10,10,10)
SLEEVES
For the sleeve, you want to make sure your sc ended back at the under arm section, you will
slst into the first sc you made, and make a ch of 61(71,71,81,81,91,91,101)
Begin with slst into 10 st with the 4.00 mm crochet hook, place a stitch marker and hdslst
into the remaining st witht he 5.00mm crochet hook.
In the last st, make an increase of 2 hdslst in the same st.
Slst to the next sc to connect the row, slst to the next sc to start a new row.
Turn your work.
In the first st, increase by placing 2 hdslst together. Repeat these 2 rows, increasing at the
top of the work for each rows till you reach the stitch marker.
Place your last increase in the stitch marker, from there, decrease.
Decrease by working 2 hdslst together.
We increased for half of the sleeve then decrease for the other half.
Repeat this till your sleeve is done, connect the sleeve by sewing with your needle. Repeat
this for the other side and your crochet fisherman sweater pattern is almost done.
What’s left? Cut off the excess yarn and weave in the ends. And your crochet sweater
pattern is all finito.
I’m wondering if you could tell me what the sizes coordinate to – are they all adult sizes? Thanks.
They are all for adults
Thank you!!!!!