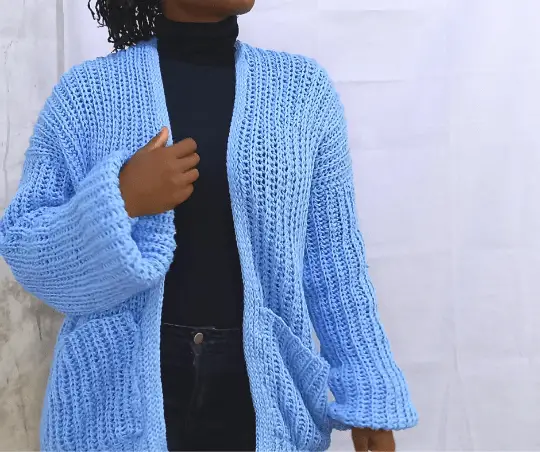
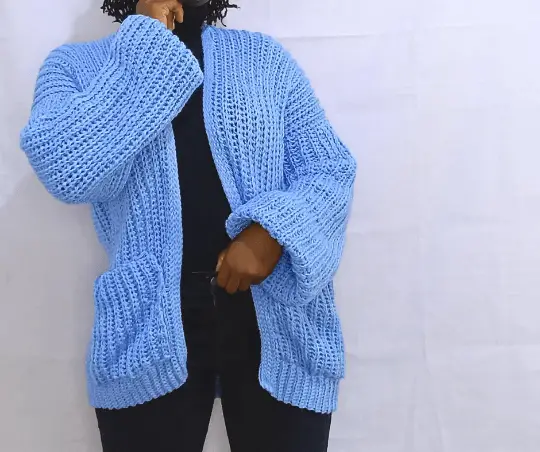
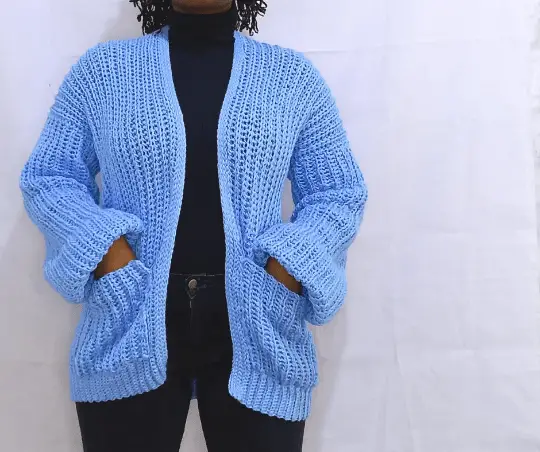
Looking for a new crochet oversized cardigan pattern to try? Look no further! In this blog post, i have put together this lovely oversized cardigan. This crochet patter is suitable for beginner and intermediate crocheters. So whether you’re looking for a new winter project or something cozy to keep you warm in the spring and fall, we’ve got you covered!
You can get the PDF pattern for $0.95 HERE

For the free crochet oversized cardigan pattern, scroll down
Crochet Oversized Cardigan
If you’re just starting out in crochet, the idea of crocheting a whole cardigan can seem intimidating. But don’t worry! There are plenty of crochet sweater patterns out there that are perfect for beginning crocheters, and this is one.
If you’re looking for a relatively simple design to try, then this free cardigan pattern is perfect for you.It uses a stitch you may not have heard of “half doble slip stitch”, if you are unsure of the stitch , then watch this tutorial and you will be on your way to making a beautiful and wearable garment.
This stylish crochet oversized cardigan is so easy to make and looks very beautiful. It looks as if it was knit by the special stitch used to make this.

Can i make this as a beginner?
Absolutely yes!
Even beginners can make crocheted sweaters. What makes the crochet cardigan look intimidating is the arms, collar, pockets, and other supplies put to it. But it is very easy.
In fact, this crochet oversized cardigan is made in one big panel. There will not be decreasing or increasing involved which can be confusing for the beginnet.
Plus, this oversized sweater pattern uses a worsted weight yarn, so you’ll work up relatively quickly.
What types of crochet sweater patterns are suitable for beginners?
There are a few things to look for when choosing a crochet sweater pattern as a beginner.
First, choose a pattern that uses basic crochet stitches like single crochet, half double crochet, and double crochet stitches. This however, does not limit other crochet stitches as long as you are comfortable with them
It is a great idea to read through the pattern, and see if there is a recommended skill level listed near the top.
Get an idea of what stitches you will use, what type of seaming will be involved, and whether you need to know any special techniques.
Second, look for patterns made of basic rectangles or other large simple shapes. You may want to avoid designs that utilize complex shaping techniques and fancy colorwork – at least for your first project. Likewise, avoid patterns that call for very lightweight or otherwise difficult yarns.
In the case of this sites crochet patterns, we always make sure to work the crochet grament body in one piece.
Third, consider a loose or oversized sweater design as an excellent starting project. These silhouettes tend to be more forgiving than fitted sweaters. This way, even if your gauge is a little off, there’s still a good chance that your sweater will fit.
Additionally, look for a well-tested pattern with detailed instructions. Video tutorials can be especially helpful for beginners, too.
Supplies for Crocheting Sweaters
Here’s what you’ll need to crochet a sweater.
Yarn
Your sweater pattern will give you instructions for the correct yarn weight, and often recommend a specific yarn. For your convenience, I’ve included links to the recommended yarns in the list below.
You can substitute yarns, but make sure to choose one that is a similar weight and fiber content. This will help you achieve the correct gauge, and ensure that your sweater has a similar drape to the one in the pattern photos.
Remember, whether you use the recommended yarn or not, it’s crucial to make a gauge swatch to make sure you’re on the right track.
How much yarn will you need? Most sweater patterns require 3-9 skeins of yarn – but it all depends on the type of sweater and which size you’re making. Waist-length sweaters need between 3-6 skeins, and longer cardigans usually require more.
Hook(s)
You’ll also need a crochet hook in the appropriate size. Again, your pattern will give you these details. Then, make a gauge swatch. After making your swatch, you’ll know whether you need to size up or down.
And, if you’re using a different yarn than the one specified in the pattern, you may need to adjust your hook size to meet the gauge.
Notions
In addition to yarn and a crochet hook, you’ll need a few other supplies before you get started on your new sweater.
- Tape measure. A tape measure or ruler will help you take your gauge, check your finished dimensions, and make sure that your sweater is the right size.
- Stitch markers will come in handy for marking your place as you work, especially if you’re working on a larger project.
- Scissors to cut your yarn.
- A tapestry needle is necessary to weave in ends and seam your finished sweater together.
Blocking Tools
Blocking is a finishing step that helps even out your stitches, and helps your sweater take on the right shape. It also allows the fabric to drape more nicely. To block your sweater, you’ll need blocking mats, T-pins, or blocking wires.
Unfortunately i do not have the video tutorial for this crochet cardigan yet, however, i have a similar crochet cardigan tutorial if you are a visual learner.

How To Crochet An Oversized Cardigan
If you have ever made a crochet cardiggan before then you know the basics, we crochet the two front bodies and the back body, connect them together, make two sleeves and sew them together.
Add the collar and arm ribbings as well as the bottom ribbings and your crochet ardigan is done.
If you ask me, that is a lot of work.
So i crochet my cardigans a little different.
Crochaet Oversized Cardigan Construction
We will work our crochet oversized cardigan in one piece.
We will begin by working on one of the front bodies, we will then proceed to the back and finally finish with the other front body piece, we will then close the shoulder portions and crochet onto the body the sleeves and the collar.
We will make the bottom band of the cardigan as we work by changing crochet hook sizes.
Sew in the pockets and weave in all the funny ends and your crochet oversized cardigan is all done.
The perfect worsted weight yarn for a crochet oversized cardigan
For this easy crochet oversized cardigan, we knew we needed a yarn that had beautiful drape, came with a lot of yardage and included a bit of luxury so you’d enjoy it for a long time. Furl Fiber Art’s Whims Merino Yarn immediately came to mind and and it worked so well.
In either case, Whims Merino yarn comes in a wonderful, sophisticated palette of colors that I think you’ll love, it is available is all so many different sizes too to accomodate different crochet projects. You can check them all out HERE.
More simple crochet projets

Crochet oversized cardigan pattern
Purchase the Ad-free printable PDF HERE or get it for $0.95 HERE
Follow our social media handles for updates: Instagram, Pinterest
Be sure to joing our FaceBook group.
Pin me for later HERE.
Supplies:
M E A S U R E M E N T S
Finished work Measurement for
size S :
Length : 25.5 inches
Wide: 28 inches
Gauge: 16 stitches in 14 rows
4”X4”
Stitch Library
-Hdslst- Half Double Slip Stitch
-Ch- Chain
-Bl-Backloop
-St- Stitches
-Rep- Repeat
Amount of yarn needed:
5 balls of 100g yarn suitable for 6.00
mm hook for sizes XS & S,
7 balls for size M,
9 balls for L,
11 balls for XL,
13 balls for 2XL,
15 balls for 3XL,
17 balls for 4XL,
19 balls for 5XL.
Sizes
XS-5XL
Good To Know
The pattern for the cardigan is worked from bottom to the top and not side to side in order to achieve the knit look.
Take note that the pattern is worked in the back loop only throughout.
The cardigan is worked using half double slip stitch throughout even in the collar, we just change the hook size. The pictures presented were in size small.
Note that you can adjust the pattern to the size you want by either adding or removing rows incase the pattern is too oversized for you or you would like it to be slightly more oversize.
Note that chaining of one does not count as a stitch.
Crochet Oversized Cardigan Pattern
Begin by estimating how long you want your cardigan to be by measuring from where you want your cardigan to reach to the top of your shoulder. if you want to make the exact same one as i did, then you can follow the numbers below.
To begin,
Ch 81(91,101,111,121,131,141,151,161)
R1: Using a 4.00 mm hook, slst into the first 10 st and place a stitch marker on the 10th stitch. Switch to a 5.50 mm hook and proceed with the hdslst till the top. Ch1 and turn.
R2: Hdslst all the way down witht the 5.50mm hook in the back loop only tilll you reach the stitch marker, switch to a 4.00 hook for the last 10 st. Ch 1 and turn.
R3: slst into the first 10 st with the 4.00mm hook up to the stitch marker, the switch to a 5.50mm hook, proceed to hdslst all the way to the top.
Repeat rows 1-3 till rows 26(30,38,46,54,62,70,78,86) You should end at the bottom of your work.
Back Panel
Begining the back pannel we should all be at the bottom of our work, start the row as normal with a 4.00 mm hook switching to the 5.50 mm hook after the stitch marker, however, leave a total of 20(25,30,35,40,45,50,55,60) stitches unworked at the top and make a chain of 21(26,31,36,41,46,51,56,61) see picture below for clarrification

R1: This will be considered row 1 of the back pannel. Into the second stitch from the hook, Hdslst all the way down with the 5.50mm hook in the back loop only tilll you reach the stitch marker, switch to a 4.00 hook for
the last 10 st. Ch 1 and turn
R2: Hdslst into the first 10 st with the 4.00 mm hook, switch at the stitch marker to a 5.50mm hook,
proceed to hdslst all the way to the top.
Repeat rows 1-2till rows 26(30,38,46,54,62,70,78,86) You should end at the top of your work.
Since this is an oversized cardigan, we will work a middle portion to help the cardigan fall off our shoulders a bit more. work 6(10,10,16,16,22,22,22,26,) extra rows for the mid section, and finalize the back pannel by
working a another 27(31,39,47,55,63,71,79,87) we should be at the bottom of our work.
begin the next row as normal but however, leave a total of 20(25,30,35,40,45,50,55,60) stitches unworked at the top and make a chain of 21(26,31,36,41,46,51,56,61)

Hdslst all the way down with the 5.50mm hook in the back loop only tilll you reach the stitch marker, switch to a 4.00 hook for the last 10 st. Ch 1 and turn. Repeat this till rows 26(30,38,46,54,62,70,78,86) ch1 and cut.

Fold the cardigan so the front pannels lay on the back pannel to sew together. Sew the shoulders together neatly.
To begin working in the arms, go around the arm hole with a row of single crochet(optional as it is easier to see the stitches, but if you can see them without the single crochet row then skip this phase), connect the yarn to the underarm of the cardign and ch56(56,66,66,76,76,87,87,97). slst with a 4.00mm hook the first
10 stitches placing a stitch marker and proceeding with a 6.00 mm hook.
when you reach the under arm portion, connect to the next st /single crochet st with a slip stitch to join the row, slst to the next st/single crochet st to begin a new row.
hdsldt in the back loop only.
repeat this till the whole arm is complete then sew the arm to close it.
Repeat with the other side.
To work the colour, we will only be using the 4.00 mm hook for this part. this part is optional but i recommend it for absolute beginners. connect your yarn and Work a row of single crochet around the collar area of the cardigan to make the stitches more visible.
Note, for the mid section we did on the back panel, place 1 single crochet into each side hdslst row.
At the end of your single crochet row assuming you did not skip this row, Ch 1 and slst all the way around, when you reach the end, ch1 and turn.
The thickness of your colar is optional, so work as many rows as you wish, as for me, i worked 6 rows. At the
end, chain 1 and cut. Weave in all the ends.
Oversized cardigan pockets
To work the pockets, with your 5.50 mm crochet hook, ch 26, hdslst all the way down, ch 1 and turn, rep this for 20 rows.
Make 2 pockets, and sew them onto the crochet oversized cardigan.
Now your project is all done.
